posted by Ahijoy on December14, 2022
How To Cut Heat Transfer Vinyl Using Silhouette Cameo 4?
Cutting the perfect intricate design is highly imperative for a successful heat transfer vinyl project. Precision is the key here that can only be obtained if you are using a professional craft cutter such as Silhouette Cameo 4. If you have just acquired this amazing equipment and want to know your way around it, we have everything in this blog to get you started with your first project.

Heat transfer vinyl is fun to work with. Available in a myriad of colors and finishes, it gives you ample liberty to customize and revamp your apparel and home décor.
The only limitation is the kind of fabric you can apply it on. It works best with cotton, polyester, poly/cotton blends and the like fabric, though some professional and experienced crafters, who love to experiment, apply it on glass, wood and leather as well for which you need special technique and expertise. The combination of right pressure and heat does the trick but these are steps for later. The first and foremost requirement is to cut the design that you have envisioned.
Before we move on to the steps and tools required to cut HTV using Silhouette Cameo 4, let's get to know more about this automated craft cutter.
What Is Silhouette Cameo 4?
Silhouette Cameo 4 is an innovative, desktop cutting machine. It can cut 12 inches wide and has the dual motor system that allows it to speed up like never before. It requires the software, Silhouette Studio, to function with your MAC or Windows system. Within the Silhouette Design Studio store there are 15000 plus designs to inspire your creativity.

The Cameo 4 works with three new tools, the rotary blade, 3mm kraft tool, and punch tool. All of these are user-friendly. It also consists of auto tool detection which ensures that you have set up the right cut settings for your project. Isn't it all amazing? Let’s see how the machine works allowing you to cut amazing designs without much effort.
Tools Required To Cut A Design With Silhouette Cameo 4
You need to get your hands on all the tools before you get started with the step-by-step guide.
- A good quality heat transfer vinyl. Ahijoy has a wide variety of supreme quality HTV to choose from.
- Silhouette Cameo 4.
- Cutting mat.
- Teflon sheet or parchment paper.
- Heat press machine.
- A compatible fabric on which you want to transfer the design.
- Weeding tool. Check out weeding pens at Ahijoy.
How To Cut HTV Using Silhouette Cameo 4?
Once you have acquired a good quality vinyl and settled on a design using the Silhouette Studio software, the next step is to cut it using Silhouette Cameo 4. Following is a step by step guide on how to go about it.

Step 1: Setting Up Silhouette Studio
Open up the Silhouette Studio software on your system. Choose your design and open it in the workspace. You can also choose a design from the Silhouette design store and save it in the cloud folder to be used later on.
Step 2: Select Loading Option
Go to the machine list at the bottom panel and select Cameo 4 from it.
Step 3: Mirror The Design
Make sure to mirror the design before you cut it using Silhouette Cameo 4. HTV designs need to be cut in reverse. To follow this step, place the cursor on the design and right click. Choose ‘Flip horizontally’ from the menu.

Step 4: Select The Cut Settings
Now go to the ‘Send’ panel of the Silhouette Studio. Open the material menu and select HTV. This will help you get the recommended settings for your desired project.
Step 5: Load HTV In Silhouette Cameo 4
You can load the vinyl in Cameo 4 both with or without the mat. Let's first see how it is done using a mat.
Loading HTV Using A Cutting Mat

- Place the HTV in the cutting mat with the shiny side down. The matte adhesive side of the HTV should face up. Since it is heat transfer vinyl, we will mirror the design.
- Make sure you have defined the cutting mat size and HTV size in the software. This you can do by opening the page setup tool in the right toolbar. The software will then show you on the screen where your material is to be placed on the cutting mat. Your actual setup should match your on screen set up.
- Once the material is on the mat, align the left hand side of the cutting mat with the leftmost guide mark.
- The right hand pinch roller should be in the proper position to grip the right hand side of the mat. Make sure that both rollers are gripping the sides of the mat evenly.
- Now press the load button or up arrow in the machine. The mat should be pulled into the machine and be ready to receive your job.
Loading HTV Roll In Cameo 4
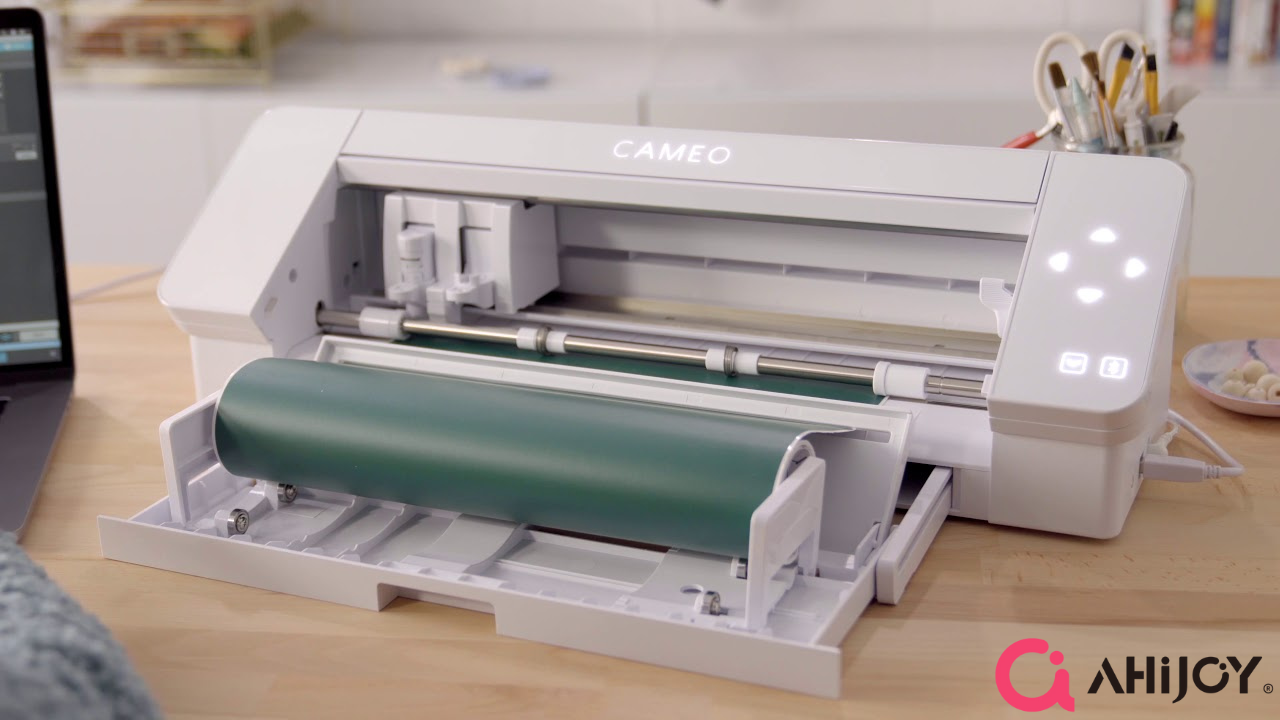
Buying the roll of heat transfer vinyl is more economical than buying the sheet. A roll can be easily fed into Cameo 4 to cut multiple or large transfers.

- Cameo 4 has a built-in roll feeder. You simply slide the bottom drawer out. Flip open the feeding flap and then load the roll that should be up to 12 inches wide.
- Now unroll some vinyl and place it up against the two rollers of the machine. The matte side should face up and the glossy side down.
- Push the release lever down and adjust the right hand side roller according to the width of the vinyl. Now pull the lever back up.
- Press the up arrow to load your vinyl into the machine.
- After your cut job is complete, you can take advantage of the Cameo 4 built in cross cutter. Press the down arrow to feed your vinyl roll through so the portion you want to cut is sticking out.
- Lock it down so you can easily slice it off by swiping the blade left or right. The cross cutter helps save a lot of material from being wasted.
Important Tip
Use both hands when loading the heat transfer vinyl in Silhouette Cameo 4. A special feature of this machine is the mat sensor that allows you to adjust the vinyl before cutting. When you press the up arrow, which is the load button, the sensor will flash, giving you some seconds to hold the mat and vinyl at the edge of the rollers using both hands. The sensor will detect the mat and the rollers will take it in.
Step 6: Cut The Vinyl
After the vinyl is loaded, press ‘Send’ on the Silhouette Studio and the machine will start doing its job.

Step 7: Unload The Design
It is advised not to unload the mat as soon as the machine stops cutting. With your weeding tool, try to lift one of the corners of your design. If it comes off easily, the machine did a perfect job, but if you have to pull at it, another round of cutting is required. In the latter case, click ‘Send’ again to cut the design properly one more time. Once you are satisfied with the design, unload the vinyl by pressing the down arrow.
Step 8: Weed Off The Negative Vinyl
Using the weeding tool, take out the extra vinyl from around and inside your design. This should reveal the actual decal that you initially visualized.
Step 9: Heat Pressing The Design Onto The Fabric
Get your fabric and heat press ready. Place the design where you want it to be on the fabric. Place Teflon sheet or parchment paper on top of the HTV and then heat press it according to the designated time and pressure.

Heat Press Temperature Guide For Vinyl
Step 10: Your Craft Is Ready!
Now remove the parchment paper and the carrier sheet and your beautiful craft is ready to flaunt!
Tips For Beginners
- Make sure to keep your first Silhouette project simple.
- Always make sure to test cut before cutting the actual design.
- Choose a T-shirt or any other large, compatible fabric to work with initially. it will be easier to use the heat press.
- Give it a try on rough unused clothing or material before you get started with the actual project.
- Use a good quality HTV like the one available at Ahijoy as they cut very easily.
- Download the Silhouette Design Studio Software beforehand.
Frequently Asked Questions
Conclusion
We hope you are now all set to use your Silhouette Cameo 4. It’s time to head for the Ahijoy website, select the HTV rolls that best suit your project from the innumerable choices we have there for you and start crafting! Follow the instructions carefully and you will rock!


